Creating a bootable USB for Windows on a Mac may sound tricky, but it’s actually a simple and effective process. It’s especially helpful for Mac users who need to run Windows-only apps or games. In this guide, we’ll walk you through each step to create a Windows bootable USB using your Mac — no advanced tech skills required, and fully compatible with both Apple Silicon and Intel-based Macs.
Requirements
Before creating a bootable USB for Windows on a Mac, ensure you have the necessary components:
- USB Drive: At least 8GB of storage space to accommodate the Windows installation files.
- Windows ISO File: Download the Windows 10 or Windows 11 ISO directly from Microsoft’s official website. Be sure to choose the version that matches the system you plan to install.
- Mac Computer: A Mac with administrative privileges, allowing you to use Disk Utility and run Terminal commands.
Once you have everything prepared, you’re ready to begin creating a bootable USB for installing Windows on your Mac. The first step is to download the appropriate Windows ISO file.
Step 1: Downloading the Windows ISO File
To create a bootable Windows USB on a Mac, the first step is to download the Windows ISO file, which contains all the necessary installation data. You can choose either Windows 10 or Windows 11, depending on your needs. Follow these steps to download the ISO:
1. Go to the official Microsoft Software Download page.
2. Choose either Windows 10 or Windows 11, and click the appropriate link.
3. For Windows 10, click “Download tool now” under the Create Windows 10 installation media section. For Windows 11, scroll to the Download Windows 11 Disk Image (ISO) section and click “Download”.
4. Follow the prompts to choose your edition, language, and architecture (64-bit or 32-bit). Most modern Macs require the 64-bit version.
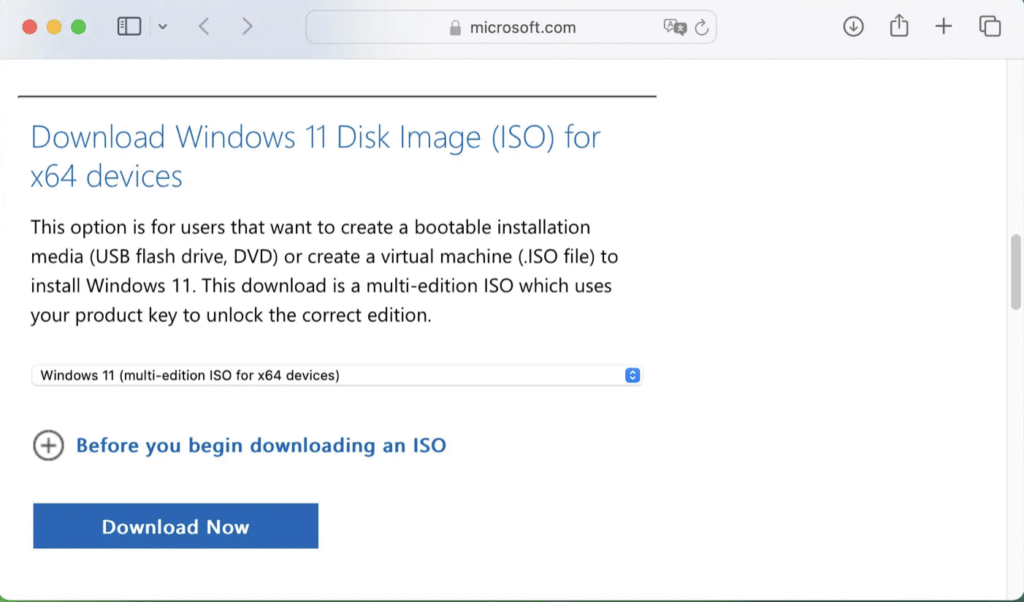
5. Click “Confirm” and wait for the download link to appear. Then, click “Download” to begin downloading the ISO file.
Once the ISO file is downloaded, the next step is to prepare your USB drive for the Windows installation. This includes formatting the drive and transferring the Windows installation files onto it.
Step 2: Preparing the USB Drive
Now that you’ve downloaded the Windows ISO file, the next step is to format your USB drive and get it ready for the Windows installation. Formatting ensures the drive is properly configured to boot Windows on a Mac. Follow the steps below to prepare your USB drive:
1. Insert the USB drive into your Mac.
2. Open Disk Utility (found in Applications > Utilities).
3. In the sidebar, select your USB drive.
4. Click the Erase button at the top of the Disk Utility window.
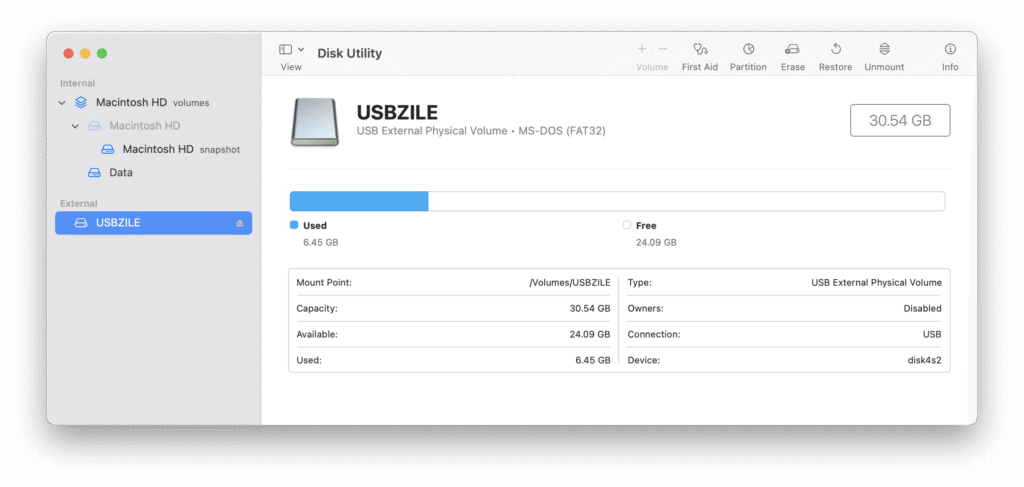
5. In the erase dialog:
- Set the Name to “WINDOWS10” or “WINDOWS11”, depending on the version you’re installing.
- Choose MS-DOS (FAT) as the Format.
- Select GUID Partition Map as the Scheme.
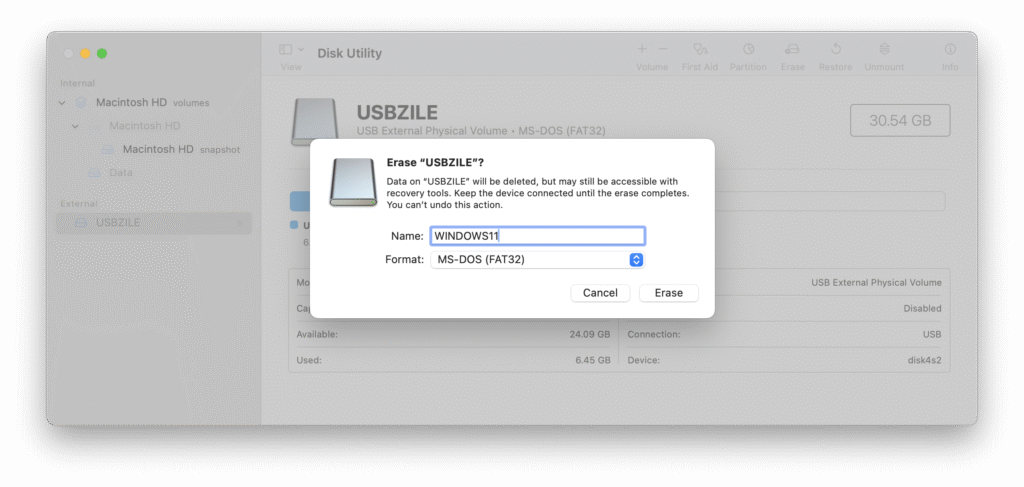
6. Click Erase to begin formatting, and wait for the process to complete.
7. Once done, click Done to finish.
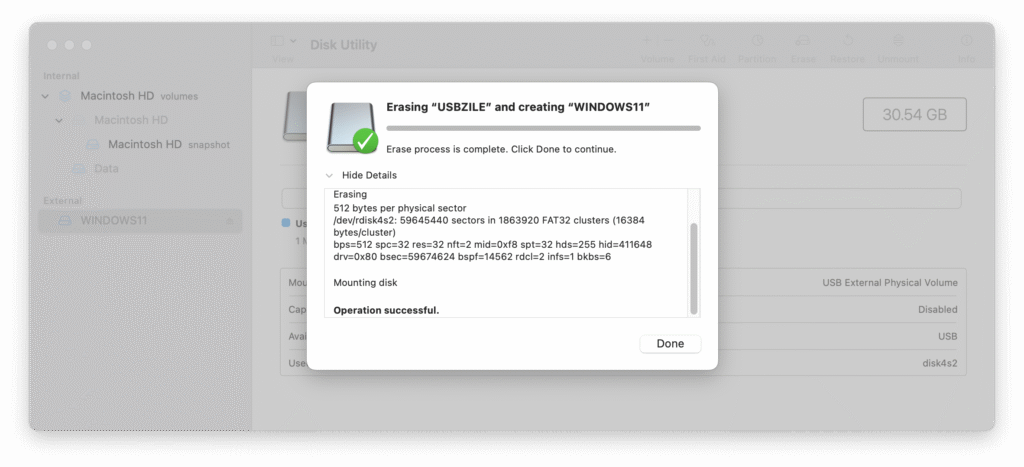
Your USB drive is now formatted and ready to have the Windows installation files copied to it. This will turn the USB into a bootable device, allowing you to install Windows on your Mac.
Step 3: Mounting the ISO and Copying Files
Once your USB drive is prepared, the next step is to mount the Windows ISO file on your Mac and copy the necessary installation files to the USB. This process will convert your USB into a fully bootable Windows installer. Follow these steps to get started:
1. Locate the Windows ISO file you downloaded earlier and double-click it to mount it as a virtual drive. It will appear on your desktop or in the Finder sidebar.
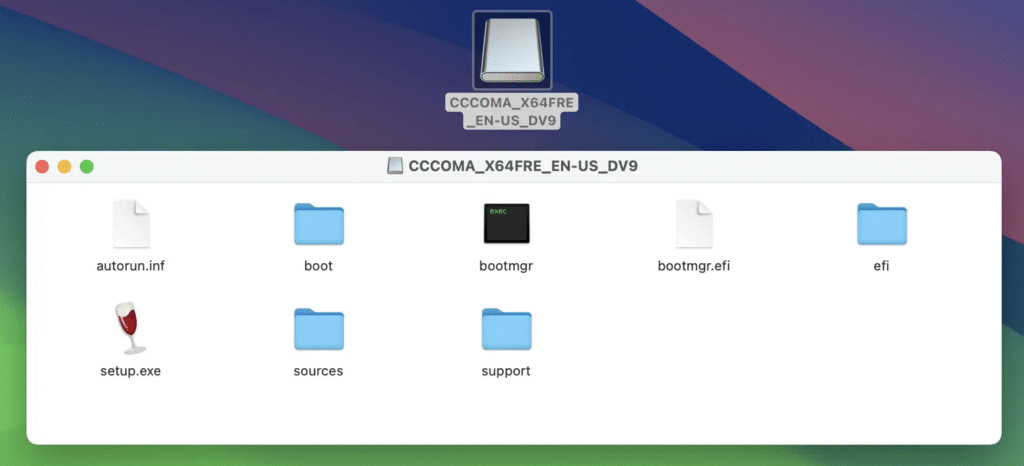
2. Open a new Finder window and navigate to the mounted ISO to view its contents.
3. Open another Finder window and go to your formatted USB drive.
4. Copy all files from the mounted ISO to the USB drive — except the “sources” folder for now.

5. Once the other files are copied, open the sources folder inside the mounted ISO.
6. Inside the sources folder, select all files except install.wim or install.esd, and copy them to the sources folder on your USB drive. If the sources folder doesn’t exist yet on your USB, you can create one manually.

By excluding install.wim or install.esd at this stage, you’re preparing for the next step, which handles this large file separately. Completing this step ensures your USB drive has all the essential Windows installation files and is on its way to becoming fully bootable.
Step 4: Handling the install.wim File
The install.wim file is usually too large to be copied directly to a USB drive formatted as FAT32, due to the format’s 4GB file size limit. To work around this, you can use a tool called Wimlib to split the file into smaller segments that are compatible with FAT32. Here’s how to manage the install.wim file properly:
1. First, check if you have Homebrew installed on your Mac by opening Terminal and typing brew -v. If Homebrew is not installed, install it by running in Terminal
/bin/bash -c "$(curl -fsSL https://raw.githubusercontent.com/Homebrew/install/master/install.sh)"
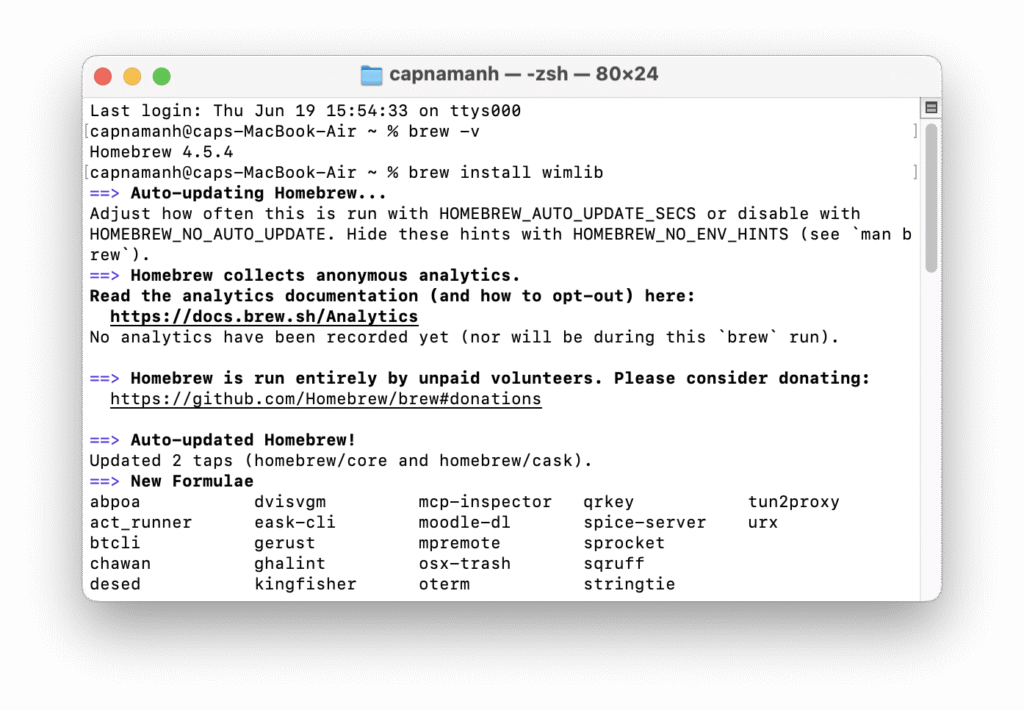
2. Once Homebrew is installed, open Terminal and run the following command to install Wimlib:
brew install wimlib
3. Find the install.wim file inside the sources folder of the mounted Windows ISO. Take note of its file path, as you’ll need it shortly.
4. Next, open Terminal, and use the cd command to navigate to the sources folder on your USB drive.
5. Use Wimlib to split the install.wim file into smaller chunks that are compatible with the FAT32 file system. In Terminal, enter the following command:
wimlib-imagex split /path/to/install.wim /Volumes/YOUR_USB_DRIVE/sources/install.swm 4000
Be sure to replace /path/to/install.wim with the actual location of your install.wim file, and YOUR_USB_DRIVE with the name of your USB drive.
After completing these steps, the install.wim file will be split into smaller files—such as install.swm and install2.swm—which are then copied to your USB drive. This process allows the files to comply with the FAT32 size limitations and ensures your USB drive becomes a fully functional Windows bootable installer.
Step 5: Finalizing the Bootable USB
Now that the install.wim file has been successfully split and transferred to your USB drive, you’re just about ready to use it to install Windows on your Mac. The final step is to verify that all files are in the correct locations and safely eject the USB drive. Follow these final steps to complete the bootable USB setup:
1. Review the contents of your USB drive to ensure everything has been copied correctly. In particular, check that the sources folder contains the newly created files such as install.swm, install2.swm, and all other required installation files.
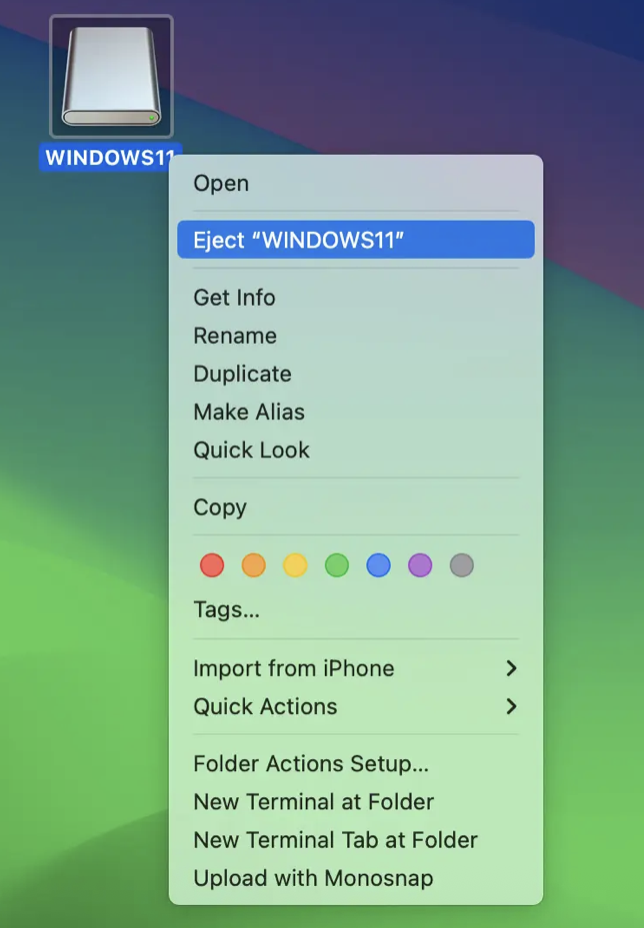
2. Once verified, safely eject the USB drive from your Mac. You can do this by dragging the USB icon to the Trash (which changes to an Eject icon), or by right-clicking (or Control-clicking) the drive and selecting Eject.
3. Your USB drive is now a fully bootable Windows installer. To use it, simply insert the USB into the target computer, restart the system, and follow the on-screen prompts to boot from the USB drive.
That’s it — you’ve successfully created a bootable USB for Windows using your Mac. Whether you’re installing Windows 10 or Windows 11, this USB provides a reliable and straightforward method to set up Windows on a Mac or any compatible PC.
Creating Windows Installation Media on macOS Using USBZile
Let’s explore everything USBZile can do:
To create a Windows bootable USB using USBZile on macOS, make sure you have the following:
- A Mac running macOS 10.15 (Catalina) or laterCompatible with both Intel-based Macs and Apple Silicon (M1/M2) models.
- USBZile – The main tool used for creating the bootable USB.
- CMOS – Required as a supporting component for USBZile.
- Windows Disk Image (ISO) – Downloadable from Microsoft’s official website (Windows 10 or 11 ISO file).
Step-by-Step: Create Your Windows Installation USB
1. Launch USBZile on your Mac.
2. Under the Device section, choose the USB stick or flash drive you want to use as the installation media. This process will erase all data on the selected USB drive.
3. In the Zip file field, select the CMOS ZIP file you downloaded earlier.
4. In the ISO image field, choose the Windows Disk Image (ISO) you previously downloaded.
5. Click START and wait for USBZile to create the bootable USB drive.
Troubleshooting and Tips
Creating a bootable Windows USB on a Mac can occasionally be tricky. To help ensure a smooth experience, here are some troubleshooting tips and additional suggestions you may find useful:
- USB not recognized: If your Mac doesn’t recognize the USB drive, try connecting it to a different USB port or restarting your Mac. Also, make sure the drive is correctly formatted as MS-DOS (FAT) with a GUID Partition Map using Disk Utility.
- Error copying Files: If you experience errors while copying files to the USB drive, check that there is sufficient free space and that the drive is not corrupted. Reformatting the USB may help resolve these issues.
- Install.wim file too large: If you’re unable to split the
install.wimfile using Wimlib, first confirm that Wimlib is properly installed. Then, ensure you’re using the correct command syntax in Terminal and double-check that all file paths are accurate. - Bootable USB not working: If the bootable USB fails to work on another computer, check the BIOS or UEFI settings to confirm that USB booting is enabled and prioritized. Also, make sure the USB drive includes all required installation files, including the split
install.swmfiles in thesourcesfolder.
Additional Tips:
- Use a reliable, high-quality USB drive to reduce the risk of data corruption and ensure a smoother, faster installation process.
- Before formatting the USB, make sure to back up any important data, as the process will erase all existing content on the drive.
- For optimal performance, consider using a USB 3.0 drive and port, which significantly improves data transfer speeds during the file copying phase.
By applying these troubleshooting tips, you can effectively resolve common issues that may arise when creating a Windows bootable USB on a Mac. While this guide is designed to simplify the process, being prepared to handle potential challenges is essential for a successful setup.
Conclusion
Successfully creating a bootable Windows USB on a Mac enables you to install Windows 10 or Windows 11 directly on Mac hardware. This guide has covered every essential step — from downloading the ISO file, formatting the USB drive, to managing large files using Wimlib — resulting in a fully functional bootable installer.
With your USB drive ready, you’re now equipped to run Windows on your Mac, unlocking access to a wider range of software and system environments for work, testing, or gaming.
For more detailed tutorials and technical tips, be sure to check out our latest posts and stay informed on future updates.